How to Meal Prep Healthy Lunches for the Whole Week

Meal prepping healthy lunches saves time, cuts food costs, and removes the daily stress of figuring out what to eat. This guide covers everything needed to plan, shop, cook, and store a full week of nutritious midday meals — from container selection and batch-cooking strategies to specific recipes that hold up for five days. Whether the goal is weight management, better nutrition, or simply reclaiming lunch hour from the drive-thru line, these techniques work.
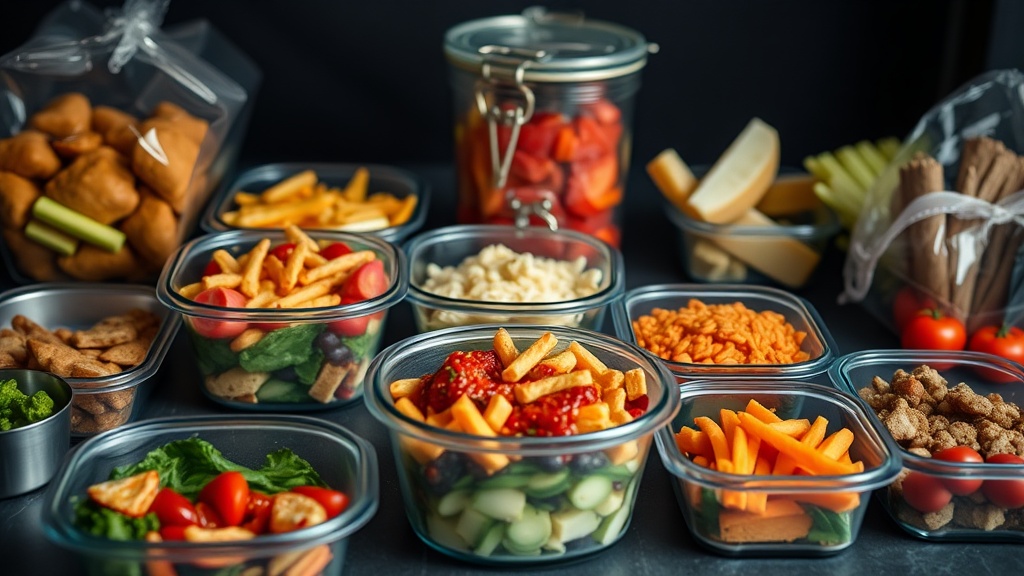
What Containers Keep Meal Prepped Food Fresh Longest?
Glass containers win for longevity and food safety. Unlike plastic, glass doesn't absorb odors or stains — and it won't leach chemicals when microwaved.
For serious meal preppers, the Pyrex Simply Store 18-Piece Set offers a range of sizes with tight-fitting lids. The rectangular shapes stack efficiently in both fridge and bag. That said, glass adds weight. For those walking or biking to work, the Rubbermaid Brilliance line provides BPA-free plastic that's genuinely leak-proof and surprisingly stain-resistant.
Worth noting: compartment containers (bento-style) work poorly for mixed dishes like stir-fries or grain bowls. They're better suited for deconstructed meals — think chicken, rice, and broccoli kept separate until eating. The Prep Naturals Glass Meal Prep Containers offer a middle ground with removable dividers.
Freezer strategy matters too. Soups and stashed portions need straight-sided containers (wider at top than bottom) for easy removal after freezing. The Ball Wide Mouth Mason Jars work beautifully for soups and overnight oats — just leave headspace for expansion.
How Do You Cook a Full Week of Lunches in Two Hours?
Batch cooking follows a simple formula: one protein, two vegetables, one starch, and one sauce — multiplied across different flavor profiles.
Start with the oven. Sheet pans handle the heavy lifting. Toss chopped vegetables (broccoli, Brussels sprouts, sweet potatoes, bell peppers) with olive oil, salt, and pepper — roast at 425°F for 25-35 minutes depending on density. Dense vegetables (sweet potatoes, carrots) go on separate pans from quick-cooking options (zucchini, asparagus) to prevent mush.
While vegetables roast, handle stovetop proteins. Chicken thighs cook faster than breasts and stay juier through reheating. Ground turkey or beef browns in minutes. For vegetarians, press and cube extra-firm tofu, then pan-fry until golden — it'll hold texture all week.
The Instant Pot (or any pressure cooker) transforms cheap cuts and dried beans. A 3-pound pork shoulder becomes pulled protein in 45 minutes. Black beans go from dried to seasoned in 30 minutes without soaking. Here's the thing: these multi-task while everything else happens.
Grains benefit from the "pasta method" — boil like pasta in excess water, drain, and cool quickly. This prevents the clumping that makes week-old rice depressing. Quinoa, farro, and brown rice all work this way.
| Cooking Method | Best For | Time Investment | Storage Life |
|---|---|---|---|
| Sheet Pan Roasting | Vegetables, chicken thighs, sausages | 30-40 minutes | 4-5 days refrigerated |
| Instant Pot | Beans, tough cuts, hard-boiled eggs | 20-60 minutes | 5-7 days refrigerated |
| Stovetop Sauté | Ground meats, quick-cooking fish, tofu | 10-15 minutes | 3-4 days refrigerated |
| Batch Grain Cooking | Rice, quinoa, farro | 20-30 minutes | 5 days refrigerated |
Sauces transform the same components into different meals. Make three on Sunday: a citrus-tahini dressing, a peanut-lime sauce, and a simple vinaigrette. Store separately in small containers (the Oxo Good Grips Mini LockTop Containers are perfect for this) and add just before eating to prevent soggy vegetables.
Which Foods Actually Last Five Days Without Getting Weird?
Not everything meal preps equally. Some ingredients deteriorate faster than Monday morning motivation.
Proteins that hold: Chicken thighs, pork shoulder, meatballs, hard-boiled eggs, baked tofu, tempeh, lentils, beans. Proteins that disappoint: Delicate fish (cod, tilapia), rare steak (turns gray), scrambled eggs (rubbery).
Vegetables that stay crisp: Roasted broccoli, cauliflower, Brussels sprouts, carrots, beets, butternut squash, bell peppers, snap peas (raw). Vegetables that surrender: Leafy salads (unless stored separately), sliced cucumbers (watery), roasted zucchini (mush), avocados (brown).
Starches that survive: Brown rice, quinoa, farro, roasted sweet potatoes, pasta (al dente). Starches that suffer: White rice (can dry out), regular potatoes (weird texture when reheated), fresh bread (obviously).
The catch? Moisture management. Even durable foods fail when stored wet. Cool components completely before sealing. A sheet pan of roasted vegetables should hit room temperature before containerization — about 30 minutes on a wire rack. Pat proteins dry with paper towels. Store sauces separately. These small steps mean Thursday's lunch tastes like Tuesday's.
Assembly Strategy: Build-Your-Own vs. Pre-Mixed
Two approaches exist. Neither is wrong.
Build-your-own (component prep) stores proteins, vegetables, grains, and sauces separately. You assemble fresh each morning — takes 3 minutes, results in better texture and variety. Requires more containers and fridge space. Best for those who get bored easily.
Pre-mixed (complete meals) assembles full lunches on Sunday. Grab and go Monday through Friday. The downside? By Thursday, everything tastes the same and textures merge. Sauces bleed into grains. Crisp vegetables soften.
Most experienced meal preppers use hybrid approaches — pre-mixing sturdy items (rice + roasted vegetables + chicken) while keeping delicate components (greens, fresh herbs, crunchy toppings) separate until the day of.
What Does a Real Week of Meal Prepped Lunches Look Like?
Theory means nothing without execution. Here's a practical framework using the batch method — approximately 2 hours of cooking yields five distinct lunches.
Sunday prep session:
- Season and roast two sheet pans of vegetables — broccoli + sweet potato on one, cauliflower + red onion on the other
- Pressure cook 2 cups dried black beans with cumin, garlic, and bay leaf
- Sear 3 pounds chicken thighs (boneless, skinless) with a simple salt-pepper-garlic rub
- Cook 2 cups quinoa using pasta method; drain and cool
- Make three sauces: lemon-tahini, peanut-lime, cilantro-lime vinaigrette
Monday: Sliced chicken thigh + roasted broccoli and sweet potato + quinoa + lemon-tahini drizzle. Add a handful of cherry tomatoes before serving.
Tuesday: Black beans + roasted cauliflower and onion + quinoa + peanut-lime sauce. Top with crushed peanuts and fresh cilantro (stored separately, added fresh).
Wednesday: Chopped chicken mixed with black beans + sweet potato + cilantro-lime vinaigrette. Serve over baby spinach (packed separately).
Thursday: Quinoa bowl with remaining vegetables, beans, and chicken — combine all remaining components with whatever sauce is left. It's "kitchen sink" day.
Friday: Pack something different. Even the best meal prepper needs a break — leftover components from the week can become a wrap, salad, or grain bowl with fresh elements from the fridge.
Smart Additions That Don't Require Cooking
These items elevate basic meal prep without additional cooking time:
- Trader Joe's Everything But the Bagel Seasoning — instant flavor on bland proteins
- Pre-washed arugula or baby spinach — adds freshness to any bowl
- Canned artichoke hearts, drained and quartered
- Jarred roasted red peppers
- Feta or goat cheese crumbles — a little goes far
- Sriracha, Cholula, or Tapatío hot sauce
- Toasted nuts or seeds (toast a batch, store in pantry)
How Do You Reheat Meal Prepped Lunches Without Ruining Them?
Microwaves work fine — if used correctly. The mistake most people make? Full power for 2-3 minutes, which overheats edges while centers stay cold.
Better approach: 50% power for longer time. A typical meal prepped lunch needs 4-5 minutes at half power, stirred halfway through. This gentler heating prevents the rubbery chicken and explosive sauce splatter that ruins office microwaves.
Moisture is the enemy of good reheating. Remove any fresh components (greens, herbs, crunchy toppings) before microwaving. Add them after. If the meal seems dry, place a damp paper towel over the container — creates steam that revives rice and vegetables.
Some foods reheat better stovetop. If the office has a hot plate or you eat at home, a quick pan-fry in a non-stick skillet with a splash of water (for grains) or oil (for proteins) restores texture that microwaves destroy. The OXO Non-Stick Pro skillet heats evenly and actually releases food — worth the cabinet space.
"The best meal prep system is the one you'll actually use. Start with two recipes, not ten. Build the habit before building complexity."
Food Safety: What the Guidelines Actually Say
The USDA recommends keeping refrigerated foods at 40°F or below and consuming cooked meals within 3-4 days. That said, many meal preppers (this guide included) push to five days without issues — assuming proper cooling, storage, and reheating to 165°F internal temperature.
High-risk foods — rice, cooked beans, poultry — demand respect. Don't leave prepped meals at room temperature for more than 2 hours. If the office fridge runs warm (above 40°F), use ice packs in an insulated bag. The PackIt Freezable Classic Lunch Box has built-in gel walls that freeze overnight — no separate ice packs needed.
When in doubt, smell test. Off odors mean compost, not consumption. The financial loss of discarded food beats food poisoning every time.
Getting Started Without Overwhelm
New meal preppers often attempt too much. They plan seven different recipes, buy $200 in specialty ingredients, and abandon the effort by Wednesday when reality interrupts.
Start smaller. Prep lunches for just Wednesday, Thursday, and Friday — days when motivation typically crashes. Use one protein, one grain, two vegetables, and store-bought sauce. Build from there.
The goal isn't culinary perfection. It's having something reasonably healthy available when hunger strikes at noon. A simple container of rice, roasted vegetables, and rotisserie chicken from Costco beats fast food — and takes twenty minutes to assemble on Sunday.
Over time, preferences emerge. Maybe Sunday batch cooking fits the schedule. Maybe morning assembly works better. Maybe freezing individual portions provides the variety that keeps interest alive. The system adapts to the life, not the reverse.
Meal prepping healthy lunches isn't about becoming the kind of person who posts perfectly arranged containers on Instagram. It's about being the person who has decent food ready — consistently, affordably, without daily decision fatigue. That outcome is worth the Sunday afternoon investment.
Steps
- 1
Plan Your Menu and Make a Shopping List
- 2
Prep Ingredients and Cook in Batches
- 3
Portion into Containers and Store Properly